
Scrubbing harder is how a five-minute removal job turns into red, irritated skin. Identify the tattoo type before you rub anything: oil and gentle wiping lift a printed surface film, while absorbed semi-permanent ink and henna stains fade rather than wipe away.
That one check decides which removal method will work. Rubbing an absorbed-ink tattoo wastes time and aggravates skin. Treating a surface film like absorbed ink leaves it sitting there for days.
Table of Contents
- How to Tell What Kind of Tattoo You Have
- How to Remove a Sticker-Style Tattoo Step by Step
- Why Absorbed Ink Fades Instead of Peeling Off
- Common Removal Problems and How to Fix Them
- What to Avoid and When to Stop
- Choose Between Waiting It Out and Removing Early
How to Tell What Kind of Tattoo You Have
A tattoo that sits on top of your skin as a printed film can lift with oil and gentle wiping. Absorbed ink, henna stains, and permanent ink follow different rules, so don't treat them like stickers.
Start with the packaging or application instructions if you still have them. The words temporary and semi-permanent aren't enough on their own to tell you how the color behaves.
Check the edges before rubbing
Look closely at the border in good light. A transfer film may have a slightly shiny edge or a thin layer that appears peelable. A stain looks flat, while absorbed semi-permanent ink appears to sit within the skin without a separate surface layer.
Don't pick at the edge to confirm it. Instead, press a cotton pad with a little baby oil against a small corner and give it time to work. Color transferring onto the pad suggests a removable surface film.
If nothing moves after allowing contact time, stop rubbing. That's a reason to reassess the tattoo, not apply more pressure. For a closer explanation of the distinction, read what a semi-permanent tattoo is.
Tattoo types and how each one comes off
| Tattoo type | How it sits on skin | How it comes off | What to expect |
|---|---|---|---|
| Transfer-film temporary tattoo | Printed film sits on the surface | Lifts with oil and gentle wiping | Often comes off in one session with patience |
| Henna or black henna stain | Dye soaks into the outer skin layer | Cannot be wiped off; fades as skin sheds | Fades gradually over days, not minutes |
| Semi-permanent absorbed ink | Ink absorbs into the outer skin layer with no film | Doesn't wash off with soap; fades as skin renews | Standard black designs last 7–10 days depending on skin and placement; colored designs fade gradually |
| Permanent tattoo | Ink sits deeper than the outer skin layer | Needs a clinician-led procedure | Not a home removal job |
The FDA's temporary tattoo and henna guidance also makes an important distinction between conventional temporary tattoos and staining products. A flat stain isn't a stubborn sticker, and black henna deserves additional caution because the FDA has received reports of skin injuries.
How to Remove a Sticker-Style Tattoo Step by Step
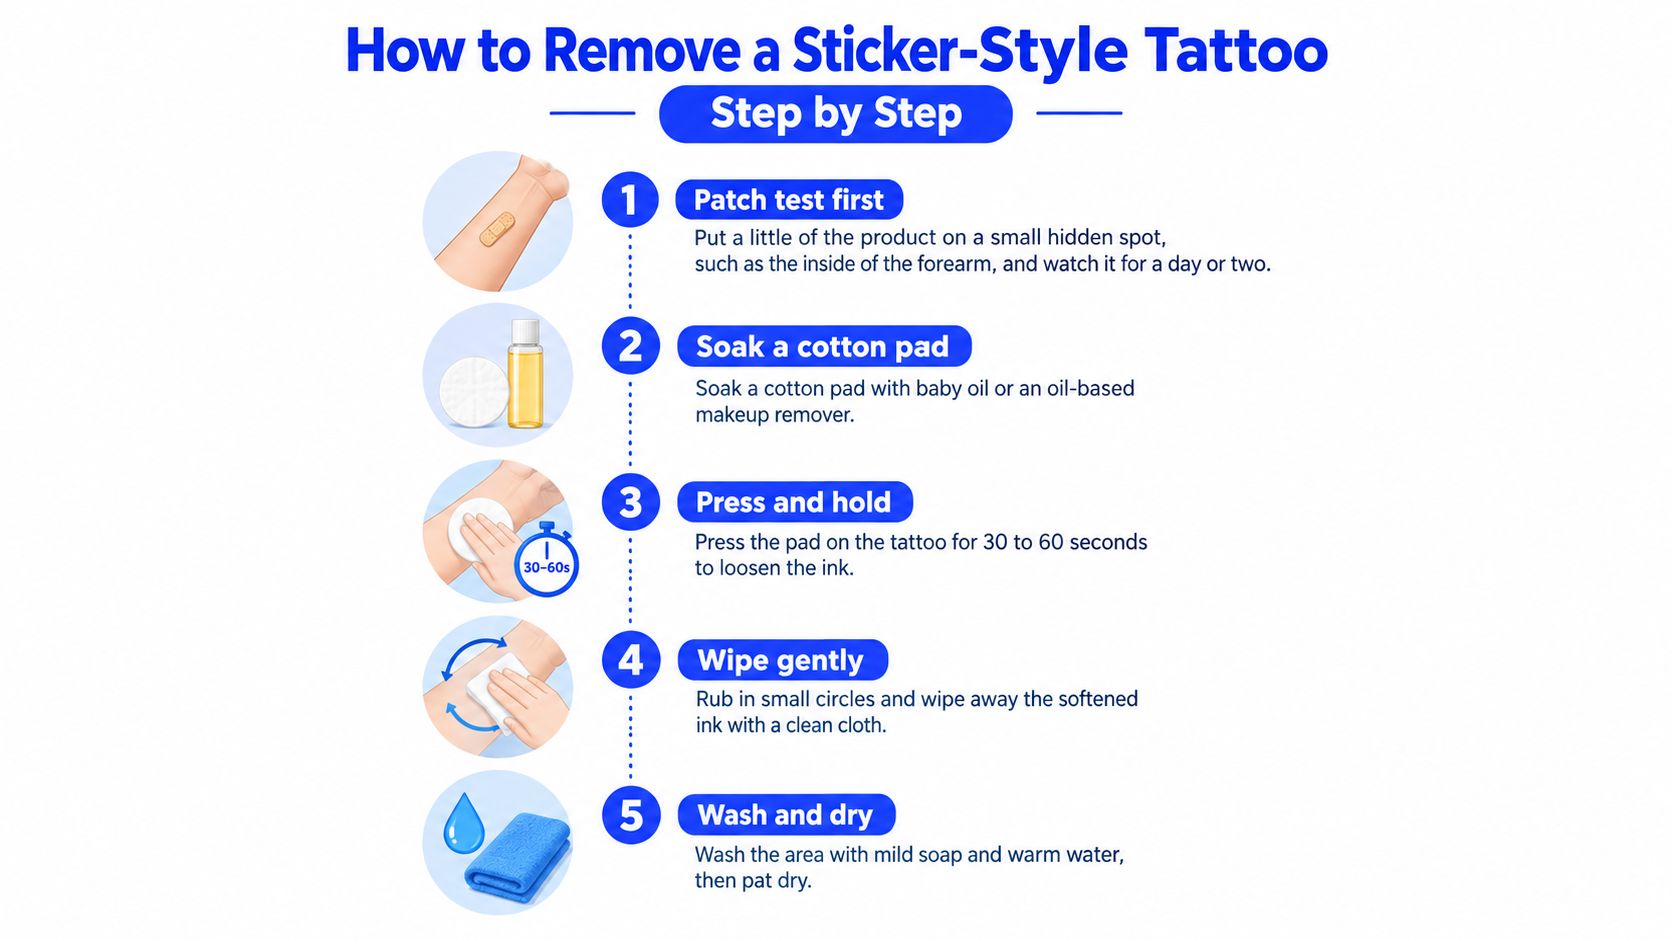
Reach for oil before anything abrasive. Baby oil or an oil-based makeup remover loosens a water-resistant surface design so you can wipe it away without scraping.
Conventional temporary tattoos also fade on their own. The FDA's tattoo and permanent makeup fact sheet says designs transferred with a moistened cotton pad generally fade several days after application. If yours is already breaking up and there's no deadline, ordinary washing may be enough.
Use contact time instead of pressure
- Patch-test first; see the safety section below. Even a familiar household oil can cause a reaction on some skin.
- Soak a cotton pad and hold it over the tattoo. Use baby oil or an oil-based makeup remover, keeping the film evenly coated while it softens. Give the oil contact time so it can work into the surface material before you wipe.
- Wipe in small circles, then pause. Light pressure in short bursts works better than one continuous scrub. The goal is lifting softened material while the skin underneath stays calm.
- Repeat once with fresh oil if residue remains. A clean pad picks up loosened color instead of spreading it around. If the design still won't lift, leave it rather than repeating indefinitely.
- Wash with mild soap and warm water. Use your fingertips to clear away oil and loose residue. Skip brushes and abrasive cloths.
- Pat dry and moisturize. A soft towel and light pressure keeps the area calm. Moisturizer helps address dryness after cleansing.
- Stop immediately if the skin burns, swells, or becomes red or sore. Rinse away the product and let the area rest. Treat any discomfort as the end of the session.
Success looks like color collecting on the cotton and less material remaining after each gentle pass. A dense or heavily layered film may need another session after the skin has rested.
Removal products and how to use them
| Product | How to use it | Best for | Watch for |
|---|---|---|---|
| Baby oil | Saturate a cotton pad, hold over the design, then wipe in small circles | Sticker-style designs with a printed film | Greasy residue; wash afterward |
| Oil-based makeup remover | Use the same hold-and-wipe method | Designs with stubborn edges | Check for fragrance and patch-test first |
| Coconut or olive oil | Apply evenly, allow contact time, then wipe gently | A kitchen-cabinet backup | Can feel heavy and greasy |
| Rubbing alcohol | If oil fails, use a lightly dampened pad for a brief pass, then rinse and moisturize | Last resort on intact skin only | Drying and irritation; keep away from eyes, lips, and open skin |
| Warm water and mild soap | Wash gently with fingertips | Daily cleanup and oil residue | Too slow alone on dense designs |
Practical rule: If the pad stays clean after two passes, stop and reassess the tattoo type.
Why Absorbed Ink Fades Instead of Peeling Off
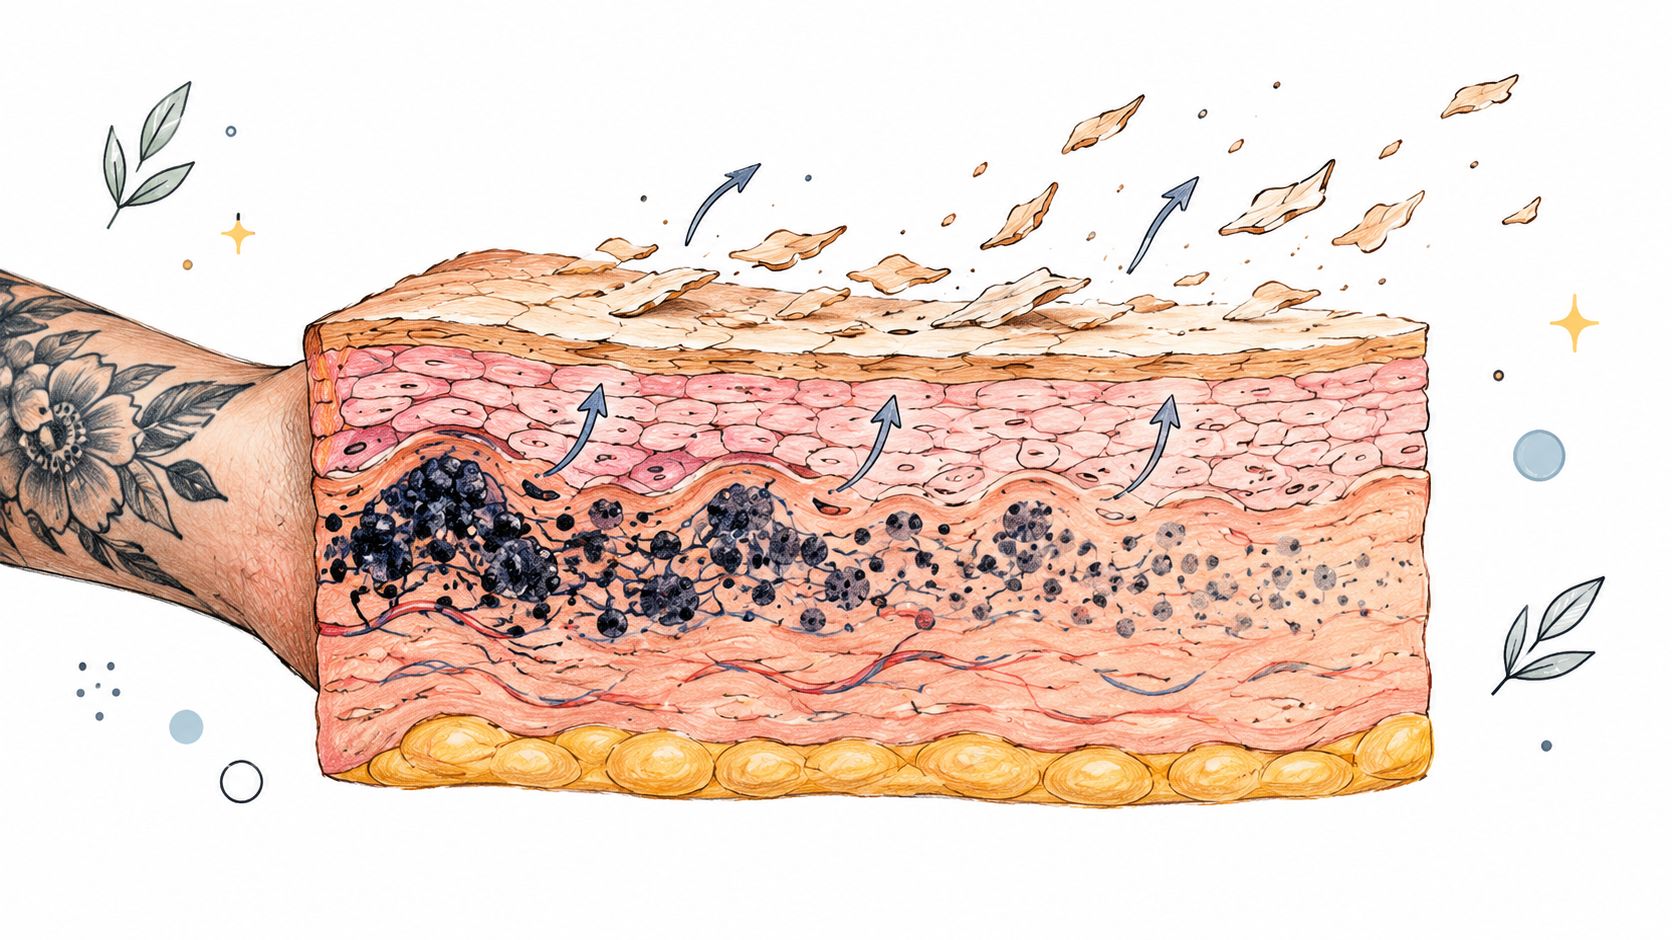
Absorbed ink sits inside the skin itself. There's no separate layer to lift away, so an oil pad can come back clean even while the design is still clearly visible. Scrubbing harder only irritates the surface; it can't reach pigment that has soaked in.
The outermost skin layer, the stratum corneum, consists of flattened, keratinized, nonliving cells. These surface cells naturally loosen and shed through desquamation, as described in this National Library of Medicine skin reference. When pigment absorbs into that outer layer, fading depends on those cells gradually being shed.
That gradual shedding is what the illustration shows. Picking, cutting, or scraping at an absorbed design reaches the living skin underneath and causes irritation without speeding the process.
Treat early removal as gradual fading
Early removal methods like a gentle exfoliant, baby oil, or rubbing alcohol work because they loosen or soften the cells carrying the pigment. Each pass takes a thin layer of surface cells with it, so color lifts gradually across sessions. That also means these methods have a ceiling: you can encourage shedding, and the skin still sets the pace.
Timing matters here. We recommend waiting at least 24 hours after application before using lotions, sunscreens, or heavy oils on the tattooed area. The color develops over about that time, so its early appearance isn't the finished result.
One more constraint: don't stack exfoliant, alcohol, and oil in a single session. Layered friction inflames the skin faster than it clears pigment.
A realistic endpoint is comfortable skin with gradually lighter color. For more on the absorption mechanism, see how semi-permanent tattoos work. Keep our application and fade instructions handy when planning both the application and eventual removal.
Common Removal Problems and How to Fix Them
When a design barely lifts after oil, reassess the tattoo before changing anything else. Either the ink sits in the outer skin layer, where oil has nothing to dissolve, or a surface film needed longer contact time with the oil.
Hold the cotton pad up after a pass. Color transferring means a surface layer is still lifting. A clean pad with no visible film points to absorbed ink, which only fades with time.
Let the location guide your next move
Hands and fingers get washed, sanitized, and rubbed constantly. Our hand tattoos usually fade sooner than the 10-day maximum for that reason, so extra removal work there is rarely worth it.
Wrists, ankles, and feet take steady friction from cuffs, socks, and shoes. That rubbing already speeds fading, so treat any removal session on these spots as a short one.
Removal symptoms, causes and fixes
| Symptom | Likely cause | Fix |
|---|---|---|
| Design barely lifts after oil | Absorbed ink, or too little contact time on a surface film | Re-identify the tattoo type before another pass |
| Skin stings or turns red | Excess friction or an irritating product | Rinse with lukewarm water and drop the product or pressure that triggered it |
| Ragged or patchy edges | Long strokes spread softened color | Work in small circles with a clean pad and pat dry between passes |
| Hands and fingers fade sooner | Frequent washing and sanitizing | Expect faster fading and skip extra sessions |
| Dry, flaky patch after removal | Remover and friction stripped the surface | Press a damp cloth on the spot so flakes lift with moisture; hold exfoliants until calm |
| Color remains after a second session | Absorbed ink with nothing left to lift | Let normal skin renewal finish fading the design |
Stop chasing patchy edges. Broad strokes on a surface tattoo smear softened color rather than collecting it, so each pass works better with a fresh pad and tight, controlled circles.
Treat dry flaking with moisture. A damp cloth pressed against the area during cleansing loosens flakes without grinding the surface, and exfoliants can wait until the spot feels calm.
Blistering, weeping, or pain that continues needs a doctor. Spreading redness or growing discomfort is not a normal stage of fading.
What to Avoid and When to Stop
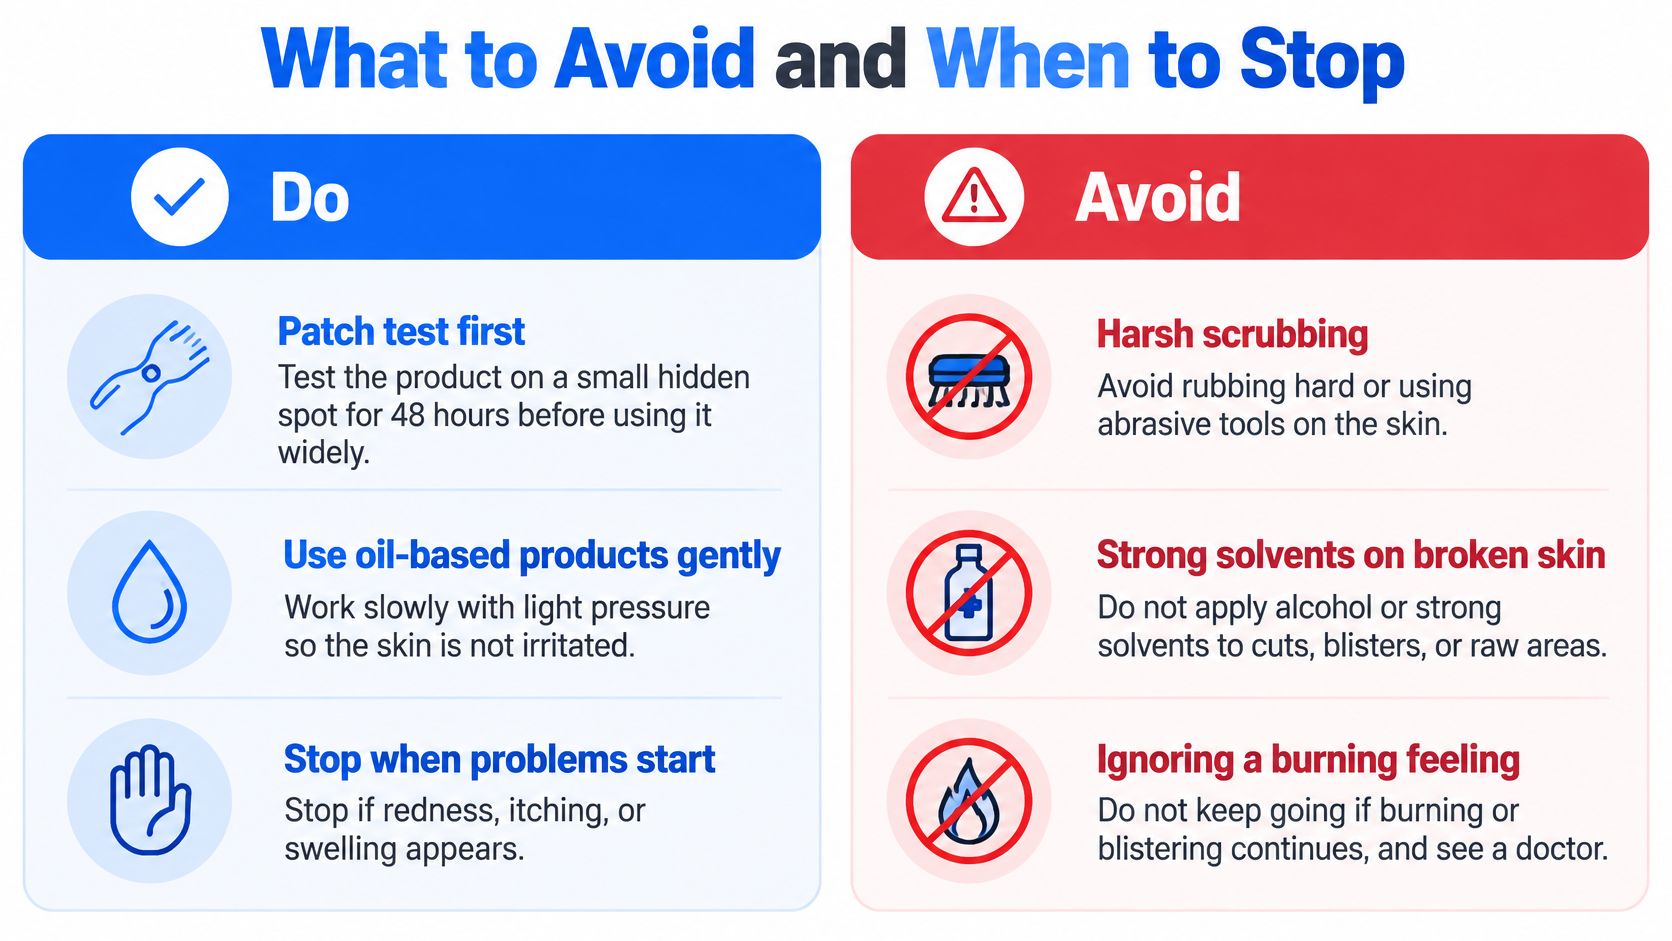
Most removal damage comes from impatience, so patch-test your chosen remover before working on the whole design, especially if your skin is sensitive or the product is new to you. Press a small amount onto an inconspicuous spot near the tattoo, leave it alone, and watch the area before committing to a full session.
The FDA's guidance on allergens in cosmetics describes clinical patch testing where suspected allergens stay covered for 48 hours, followed by checks for redness, rash, or raised bumps at roughly 72–96 hours. Home testing runs on the same logic at a smaller scale. A clear patch still calls for light pressure and short sessions on the first full pass, since quick home checks catch obvious irritants only.
Keep the method proportionate
| Do | Avoid |
|---|---|
| Match the remover to the tattoo type | Scrubbing absorbed ink harder to speed it up |
| Use light pressure and allow the product contact time | Harsh scrubbing, picking, or abrasive tools |
| Work only on comfortable, intact skin | Applying alcohol to cuts, blisters, freshly shaved, or raw skin |
| Rinse away remover and moisturize afterward | Layering multiple removal methods |
| Stop when discomfort starts | Continuing because some color remains |
Force cannot fix a type mismatch. Ink that has absorbed into the outer skin layer will not lift under friction, so extra pressure only buys you irritation. Rubbing alcohol also stays clear of eyes, lips, and mucous membranes, and it suits skin poorly when the area is already sensitive or eczematous.
Skip unapproved tattoo-removal creams, acid peels, and DIY removal kits. The FDA's tattoo removal warnings explain that these products can cause rashes, chemical burns, and scarring. A temporary design that fades on its own never justifies that trade.
Black henna requires particular caution: a reaction may stem from the original product as much as your removal technique. Our guide to semi-permanent tattoo safety considerations covers what to check before another application.
When to stop: discomfort that builds during a session ends the session. Leftover color is cosmetic, and time handles it. Skin that keeps protesting needs rest, and continuing symptoms need a doctor.
Choose Between Waiting It Out and Removing Early
If a surface film is lifting comfortably, continue with the gentle oil method. If you're dealing with absorbed ink, choose between letting it fade naturally and beginning a restrained fading routine after the development window.
Waiting is a valid removal method. It's especially sensible when the remaining design bothers you less than repeated cleansing would. If you need it gone sooner, aim for gradual improvement rather than promising yourself a blank patch of skin by tonight.
Plan the next design around the fade
Just Tattoos offers realistic-looking, semi-permanent tattoos for adults made with plant-based ink, applied at home without needles. They develop over about 24 hours; most standard black designs last 7–10 days, depending on skin and placement, while colored designs fade gradually without a set timeline. Our tattoo longevity guide explains what to consider when planning wear.
A temporary hand design lets you see how the artwork reads at work and through a real week before choosing permanent ink. That trial is about appearance and placement, not a guarantee that every hand design stays unchanged throughout it.
For a modest placement test, browse the Small collection and consider your forearm or ankle. Compare shapes and sizes across the full tattoo collection before choosing your next application.
The gentlest method that lifts a film, or the patience to let absorbed ink fade, is almost always the right answer.
Just Tattoos offers realistic-looking, plant-based semi-permanent tattoos you can apply at home without needles, with shipping available in the US only. Visit Just Tattoos to choose a design and placement with a clear understanding of how it develops, wears, and eventually fades.